Setting up an IBM i environment for PHP development can seem daunting, but this guide aims to simplify the process. We’ll walk you through each step, from installing PHP and ODBC to configuring your IDE, ensuring you’re ready to develop dynamic web applications on IBM i with ease. Whether you’re new to the platform or integrating PHP into your workflow, this tutorial will help you get started.
In this blog post, you will learn how to:
Set up a PUB400 Account: Create and configure a PUB400 account to facilitate access to IBM i resources, including remote connections to Power Servers and related tools.
Install IBM i Access Client Solutions (ACS): Instructions for installing ACS, which is essential for ODBC connectivity and other IBM i operations.
Install ODBC Driver: Ensure that the IBM i Access Client Solutions (ACS) is installed on your IBM i system.
Configure ODBC: Learn how to set up ODBC for database connectivity between PHP and your IBM i system.
Install PHP on IBM i: Step-by-step instructions for setting up PHP on your IBM i system, ensuring it’s ready for development.
Set up VS Code: Install and configure Visual Studio Code to work seamlessly with IBM i for an efficient development experience.
1. Set up your PUB400 account.
What is PUB400?
PUB400 is a public IBM i server that provides a free, cloud-based environment for learning, testing, and experimenting with IBM i (AS/400) systems. If you already have access to an environment you can use, you may skip this part of the tutorial.
Getting Started
- To create your PUB400 account, click here to begin the registration process. It’s straightforward—similar to signing up for any other online account. Once you’ve completed the registration form, you will receive a verification email to confirm your account creation.
Now that we have our PUB400 account ready, let’s move on to installing IBM i Access Client Solutions (ACS), which will facilitate connecting to the IBM i system and configuring ODBC.
What is Access Client Solutions?
IBM i Access Client Solutions (ACS) is a set of tools and utilities from IBM that facilitates the management and interaction with IBM i (AS/400) systems. It is an essential software package for users and administrators working with IBM i systems, providing a modern, graphical interface for a wide range of tasks. ACS is free and available on IBM’s website. If you already have Access Client Solutions or a similar tool installed, you may skip this step.
If you do ACS already installed, ensure that you have a version that is up to date.
- Open the IBM i Access Client Solutions application.
- From the main menu, go to Help → About IBM i Access Client Solutions.
- Verify that you have the latest version of ACS (1.1.9.7), as older versions might not support the necessary ODBC drivers or may have bugs that could affect your workflow.
Getting Started
An IBM ID is required to move forward with this step. Sign up for an IBM ID here to proceed with the ACS installation.
2. Download and Install ACS
- Navigate to the IBM i Access Client Solutions download page located here.
- Click the “Downloads for IBM i Access Client Solutions” link.
- Read and review the license agreement. Check the “I agree” checkbox, then click Confirm.
Select the Correct Package
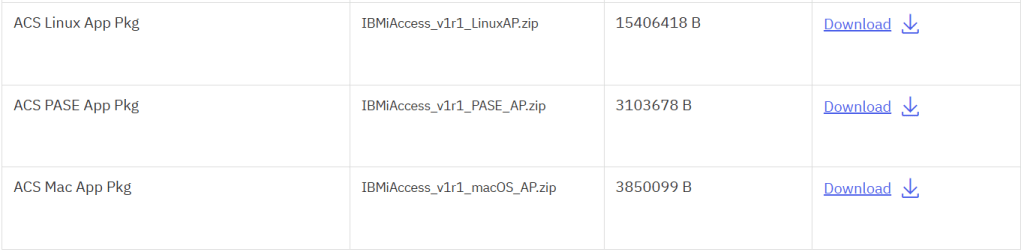
You will need to download the packages highlighted in red:

IBM i Access Client Solutions (ACS): This package provides the necessary tools to interface with IBM Power Systems. The ACS Windows Application Package includes the ODBC drivers, which we will configure later.
If you’re using Mac, Linux, or PASE, download the corresponding package for your operating system to access the ODBC drivers.
Install ACS
- Open the IBMiAccess_v1r1 Zip file.
- Double-click the acsbundle Executable Jar File to begin installation.
- Follow the installation steps included here.
The 5250 emulator is used to connect to IBM i systems through a text-based interface.
With ACS installed, let’s now move on to configuring your PUB400 connection.
Configure PUB400.com on ACS.
- Open ACS: Double-click your ACS icon, go to System Configurations, and select New. Enter the necessary values in the General Tab.
- Click Verify Connection. If successful, the connection details will populate in the window.

- Open the 5250 Emulator after selecting PUB400.com as your system.

- Log In: Enter the username and password you used when creating your PUB400 account.
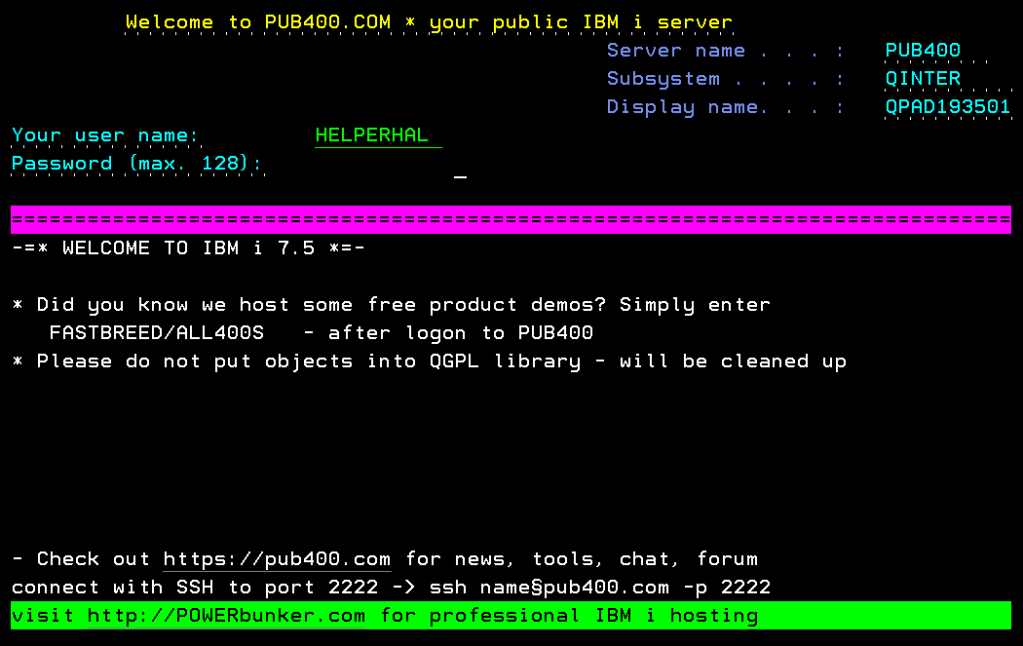
Congratulations! You are now successfully connected to the Power Server provided by PUB400.com.
Now with your PUB400 account set up, let’s set up your ODBC Driver.
3. Install the ODBC Driver.
What is an ODBC Driver?
An ODBC (Open Database Connectivity) driver is a software module that enables applications to connect to and communicate with a database. It acts as a bridge between an application and the database management system (DBMS), allowing the application to run SQL queries and obtain results. ODBC allows applications to connect to DB2 on IBM i and run SQL queries seamlessly.
Getting Started
- Open ACS Installer
Navigate to the ACS installer package you downloaded earlier. It should be named “IBMiAccess_v1r1_YourOperatingSystemAP_English” (e.g., “IBMiAccess_v1r1_WindowsAP_English” for Windows).
Double-click on the Image64a folder. Inside, there will be a Setup file. Double-click it to begin the installation.
Installing the Application Package
- Select your language, then read and accept the terms of the license agreement.
- Choose the destination path for installation, select the Typical Install type, and click Install.
Configure Data Source Name (DSN).
- Press the Windows key + R to open the Command Prompt. (For other operating systems, use the equivalent of Run.)
- Type
odbcad32.exe, then press Enter. - In the window that appears, click Add.
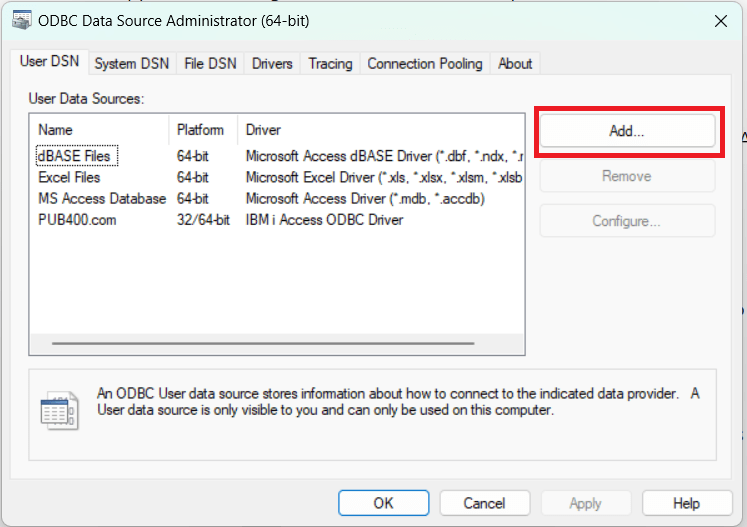
- From the list, select the IBM i Access ODBC Driver and click Finish.

Configure Connection
- In the new window, type PUB400.com for the Data Source Name and click OK.
- In the System field, type PUB400.com again.

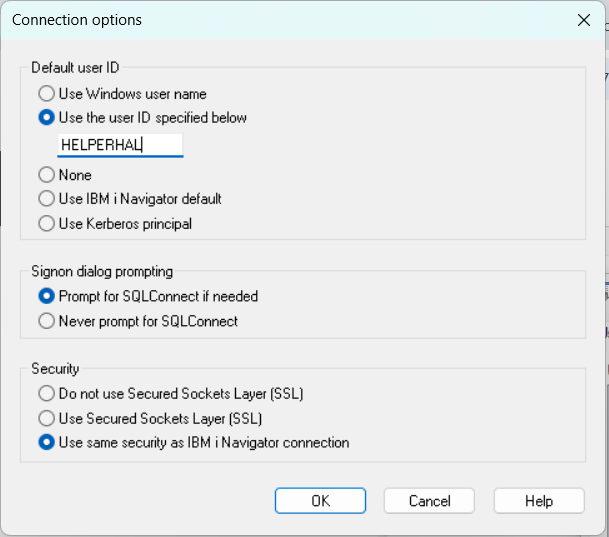
- Click Connection Options, enter your PUB400 Username to default to your User ID, and then click OK.
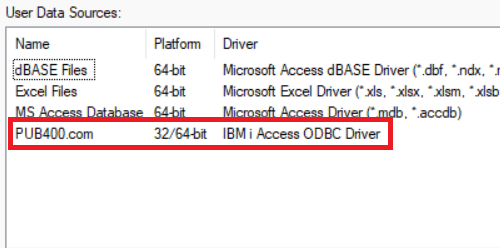
Verify DSN
You should now see PUB400.com in your User Data Sources list.
Now that we have set up your ODBC Driver set up, let’s install PHP.
4. Install PHP
What is PHP?
PHP (Hypertext Preprocessor) is a language used for web development. It is a server-side language, which means that it communicates with the server and is capable of creating dynamic content that interacts with databases, and does things that HTML alone cannot do.
Getting Started
- Install PHP.
You can find a nice video tutorial on how to download PHP here.
After installing PHP we will need to alter our PHP.INI file. Navigate to your php root file. Be sure to verify you are using an up to date version of PHP. If you followed the above video, it should be C:\php-8.4.1. To do this, you will need to create a phpinfo.php file. If you have not downloaded and installed VS Code yet, you can open notepad.
- Save the following code as phpinfo.php and put it in C:\php-8.4.1.
<?php phpinfo(); ?>
Start a LocalHost.
- Open command prompt.
- Type command prompt in your search bar and click on it.

- Type cd and a space then the root directory of your php folder. For Example: cd C:\php-8.4.1
Start a local host for PHP from this folder.
- Type the following: php -S localhost:8000
If successful, you should get a message like the following:
PHP 8.4.1 Development Server (http://localhost:8000) started
Check if PHP was installed correctly and find php.ini file location.
- In your web browser, type in the following: http://localhost:8000/phpinfo.php
You should be met with the following screen. If you have, congratulations, you have successfully installed PHP and started a local host!
If localhost doesn’t work, ensure no other service is occupying port 8000 or try using a different port.
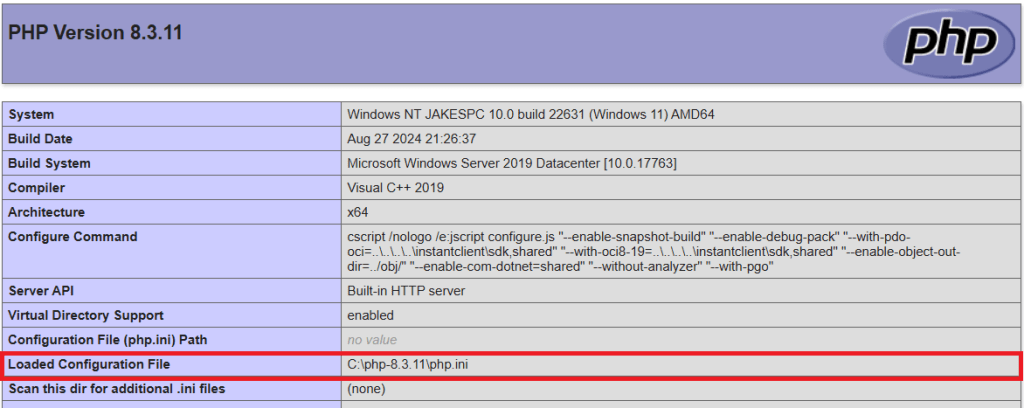
If you look in the highlighted area, you should find the path to your php.ini file.
5. Enable PDO.
What is PDO?
PDO (PHP Data Objects) is a database access layer in PHP that allows you to interact with the database. It has methods that allow you to interact with databases without regard to what database management system (DBMS) is being used.
You will see a php.ini-production and php.ini-development file.
Enable Extensions
- Open either of these with VS Code, or notepad if you have not installed VS Code yet.
- Do a find (CTRL + F) and search for “PDO“.
- Remove the semicolon from the ODBC and PDO_ODBC extensions.
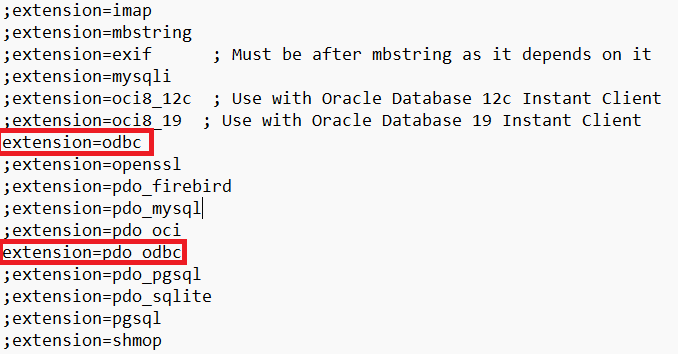
When you uncomment extensions like extension=odbc and extension=pdo_odbc in your php.ini file, you are enabling specific PHP functionality that allows your PHP scripts to interact with ODBC databases and perform operations with them.
- Save as php.ini in your PHP root folder C:\php-8.4.1. If you are using notepad, use “All Files” for the file type. This will ensure that the file is treated as an .ini file and not a .txt.
- You will need to restart your localhost after making these changes, so the update to the file is properly reflected.
Verifying ODBC Connectivity.
- Open notepad or VS Code and create a new file.
- Type the following and save as PDOTest.php. If you are using notepad, be sure to save as type “All Files” to ensure it is processed correctly. This script checks the connection to IBM i and confirms if PDO works.
<?php

$dsn = 'odbc:PUB400.com';
$user = 'YourUserName';  // Replace with your PUB400 username
$password = 'YourPassword'; // Replace with your PUB400 Password

try {

    $pdo = new PDO($dsn, $user, $password);
    $pdo->setAttribute(PDO::ATTR_ERRMODE,PDO::ERRMODE_EXCEPTION);
    echo "Connected successfully!";

} catch (PDOException $e) {
    echo "Connection failed: " . $e->getMessage();
}

?>- If your localhost is still running, type the following into your browser: http://localhost:8000/pdotest.php
If you have done everything right, you should be met with text that says “Connected successfully!“.
If you see an error like ‘Connection failed: could not find driver,’ double-check your php.ini settings and ensure the ODBC driver is installed correctly.
6. Set Up Visual Studio Code for Development.
What is VS Code?
Visual Studio Code (VS Code) is used to edit code and is developed by Microsoft. It’s widely used by developers for writing and editing source code, with support for various programming languages and tools.
Getting Started
- Follow this tutorial by Microsoft on how to download and install VS Code.
- Watch this video by Liam Allan, which explains how to set up the Code for i extension. This extension enables developers to write applications that run on IBM i systems.
In Closing
Now that your environment is set up, you can start creating dynamic PHP applications on IBM i. For a deeper dive into working with DB2, check out our next post on querying IBM i databases with PHP.
Feel free to leave a comment below or send an email with any questions or challenges you’ve faced while setting up your IBM i environment!
Cited and Additional Resources.
Video Tutorial: How to Download PHP
- NovusPad 2023. How to download and install PHP for IBM i. [Video]. YouTube. Available at: https://www.youtube.com/watch?v=n04w2SzGr_U
Video Tutorial: How to Set Up Code For i for IBM i Development
- Liam Allan. 2021. Code for IBM i: Introduction and Setup (#1). [Video]. YouTube. Available at: https://www.youtube.com/watch?v=jh9ceSaTG2o
PHP on IBM i
- IBM. (n.d.). PHP on IBM i. IBM Support. Retrieved November 17, 2024, from https://www.ibm.com/support/pages/php-ibm-i
Running Visual Studio Code on Windows
- Visual Studio Code. (n.d.). Running Visual Studio Code on Windows. Visual Studio Code Documentation. Retrieved November 21, 2024, from https://code.visualstudio.com/docs/setup/windows
